
Who am I?
I am a 17 year old guy from the Netherlands. I’ve received my OnePlus One (64GB Sandstone Black) Friday 12/9/2014 and I want to share my user experience with you.
The amount of time I use my phone is a just a little bit above average. Mostly because I’ve been testing my device for this review.
The Design
Of course, this phone has premium design. That’s something you’d expect from “The Flagship Killer.” It looks great and it feels great. The screen is (what it looks like) placed on top of the device itself, you can the sides of it. It looks good and gives it a solid feeling. The aluminum looking bar around the side of the device doesn’t only give a premium look, it also feels pleasant in the hand.
Now the most important thing about the design: the backside! This back feels like a kind of really soft sandpaper. It feels really pleasant in your hand and gives you extra grip. The extra grip is a nice addition for a phone this size.
The buttons are also an important part of the phone. The power button feels like it exactly on the right place, it feels solid and looks great. The volume rockers feel a little bit different though. It’s the same design as the power button, but the volume rockers just feel too small for the size of the device. It’s not a big complaint, just a minor point to take note of.
The 3.5mm headphone jack is on the topside of the device. I personally prefer it to be on the bottom side, because I slide my phone into my pocket upside down. It’s not even close to being a dealbreaker though.
The Firmware and the UI
CyanogenMod 11S 33R is the Firmware my OnePlus One is currently running. It runs through transitions really smoothly and the animations look really neat. I particularly love the Stand-by animation which looks like you’re turning off an old TV. I am used to this animation though, because my old HTC Desire HD was running a version of CyanogenMod too.
Because of this I knew some of the features it has too, like the: Drag across the notification bar to change brightness. I’ve loved this feature and I am still using it right now.
When you wake up your device, the screen turns on from being dimmed to getting to the brightness you have it set to. You’ll have to drag the block in the screen down to unlock your device. I don’t know how it looks when you have a password set to unlock your device, so I can’t tell you anything about that.
If you’ve set a wallpaper and you switch to your All Apps screen, the wallpaper will stay in the background. You won’t have a black background, like I am used to. I love this though, it gives some extra color to everything.
Camera
Well, let’s start talking about the camera! It is a 13MP camera. These are some of the pictures I have taken, most of them are in low light situations: http://imgur.com/a/16AHW
I think the 13MP performance of this camera in low light situations is pretty decent.
You can choose in what quality you want to capture the pictures though, like 12MP, 11MP and so on and so forth. There are many options for the camera I haven’t tried yet though, like the long exposure option and the time-lapse option. There are plenty of videos out there on YouTube to be able check these options out, so I suggest you watch those if you really want to use these option.
The video camera is pretty good too. It can film 4K at 30FPS, 1080P and 60FPS and if you film at 720P you even have the option to film in a solid 120FPS! My only complaint about the slow motion filming is that it doesn’t record the sound.
Speakers
The OnePlus One has its speakers on the bottom side of the device. It looks like there are 2 speakers there. With pop music (as far as I’ve tried, I hate pop music…) they give some pretty good sounds. You can change the way the music sounds with their equalizer app, which is pretty cool. I haven’t really found great settings for Rock and Metal yet though, but so far I haven’t gotten good sounds out of the speakers for the shredding guitars, they still sound a little canny. Compared to other speakers I’ve tried, they perform really well though. The speakers are also quite loud, which is a plus in my opinion.
I still feel like OnePlus should make their own music app though, because Google Play Music is too chaotic for my likings. I am using DoubleTwist to listen to music, it has a much cleaner interface.
The Screen
Yes, this screen takes some getting used to, I moved up from my HTC Desire HD with a 4.3” screen to the OnePlus One, with a 5.5” screen. This really was a big difference. My first though: SO MUCH ROOM FOR ACTIVITIES! So after getting used to the screen (which only took an hour of usage) I found out that I can use the phone with one hand pretty well. This won’t be the case for everyone though, my hands are a little bit bigger than average. This screen size it perfect for me though!
The colors of the screen or pretty spot on, I love the vibrant colors. There is no yellow-ish color instead of white, white is just white. Lately I haven’t heard anyone complaining about the yellow band, so I guess it’s safe to say this problem is over. Don’t worry about it anymore. I am also happy with the response time of the touchscreen, it’s pretty quick and I haven’t had any problems with the screen not recognizing my touches.
Battery
The battery is a 3100mAh one. Yes, it’s quite a big battery! I won’t bore you with a long story about how good it is and what you can do with it… It’s just a solid battery. It’s not replaceable, but this isn’t necessary. After a full day of use at full brightness I still have 30-40% battery left. This is WITHOUT gaming on it.
If I play games for about an hour a day, I will have 15-20% battery left, with this I still have the screen on full brightness. Pictures of battery life and screentime will follow!
Performance and Benchmarks
The phone runs really smooth using any app. Multitasking and switching in between apps also works like a charm. No framerate drops whatsoever. The framerate is solid and the response times are really quick. Benchmarks:
AnTuTu:
http://imgur.com/x0GXSwD
Comparison
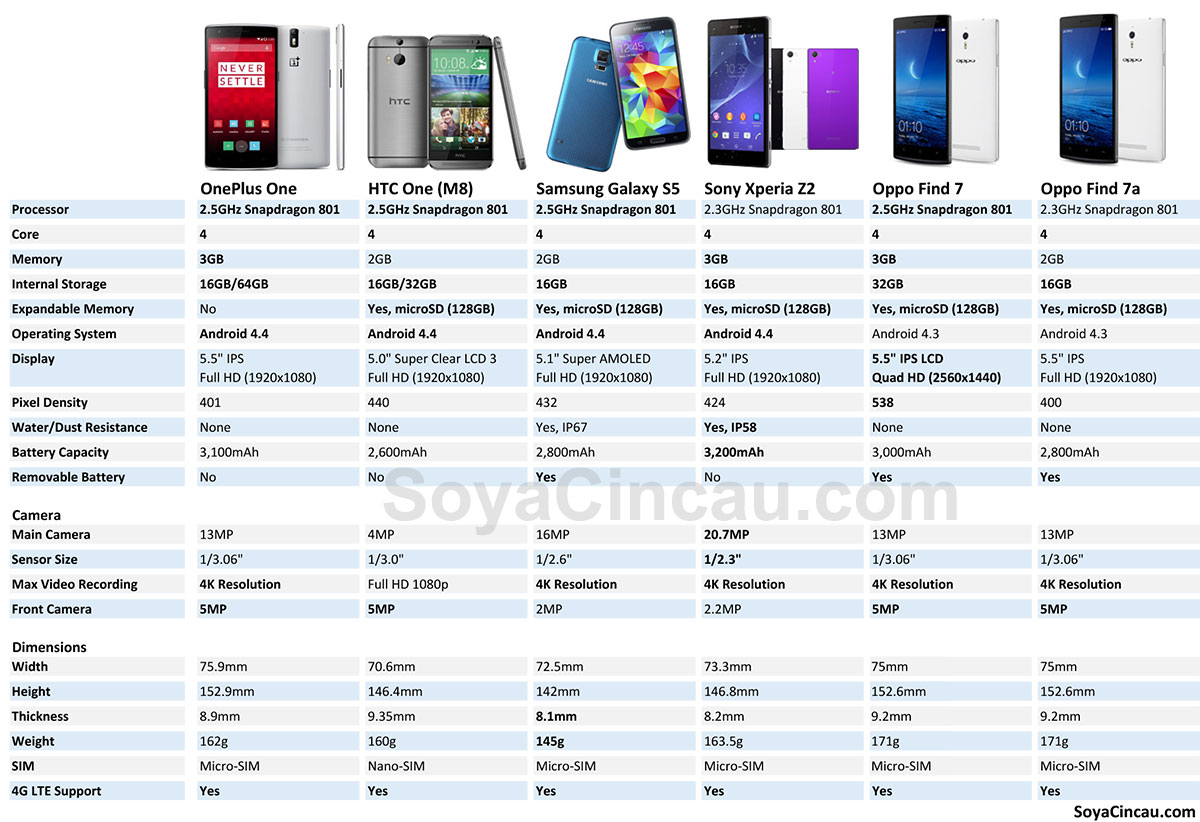
Summary
The OnePlus One is a solid device with great looks, awesome performance and a great UI. With its price it’s simply the best bang for your bu… Wait, it’s just the best smartphone on the market. Its performance exceeds everything, it looks great and it feels awesome in the hand. What else do you want? I’d say: Buy this thing!
Unboxing
A bonus for the people who are still here:
http://imgur.com/a/4L4Dr
Credits:
A guy name Transparant from Netherlands on The Fellowship forum of One Plus One.


